
Rump Cap Roast (Juicy, Flavorful, and Perfect for Slow Roasting)
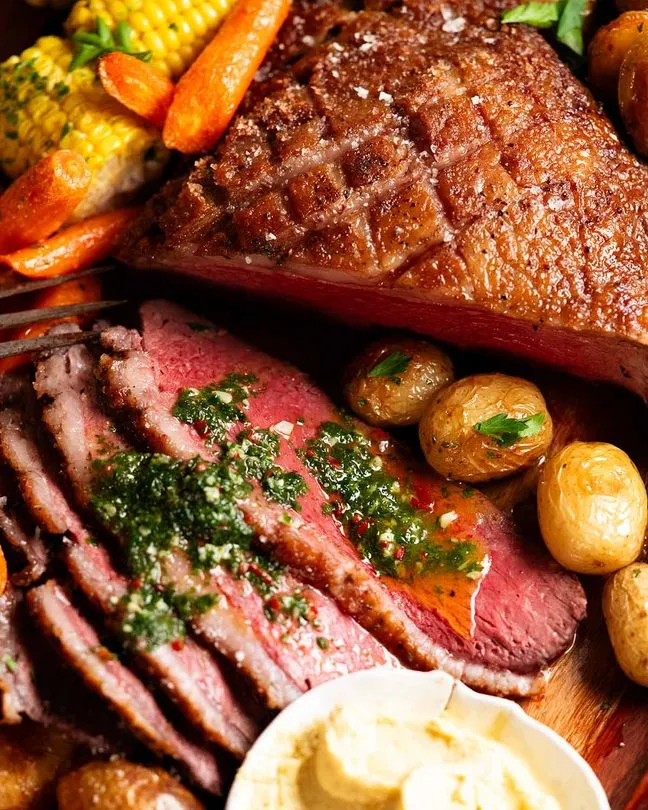
Rump cap roast, often known as picanha, is a prized cut of beef known for its rich flavor and signature fat cap. When cooked properly, it produces slices of tender meat with a deeply savory crust and juicy interior. The fat layer melts slowly during roasting, naturally basting the meat and adding remarkable depth.
This recipe matters because rump cap is simple but requires attention to temperature and slicing. Overcooking can dry the meat, while improper slicing can make it feel tougher than it actually is. With the right technique, it becomes one of the most satisfying beef roasts you can serve.
Why People Love It
This recipe works because the fat cap is left intact during roasting. As the roast cooks, the fat melts gradually and keeps the meat moist. High heat at the beginning helps create a flavorful crust before the roast finishes gently in the oven.
People love rump cap roast because it delivers strong beef flavor without complicated seasoning. Salt, pepper, and simple aromatics are enough to let the quality of the meat stand out.
Flavor and Texture You Can Expect
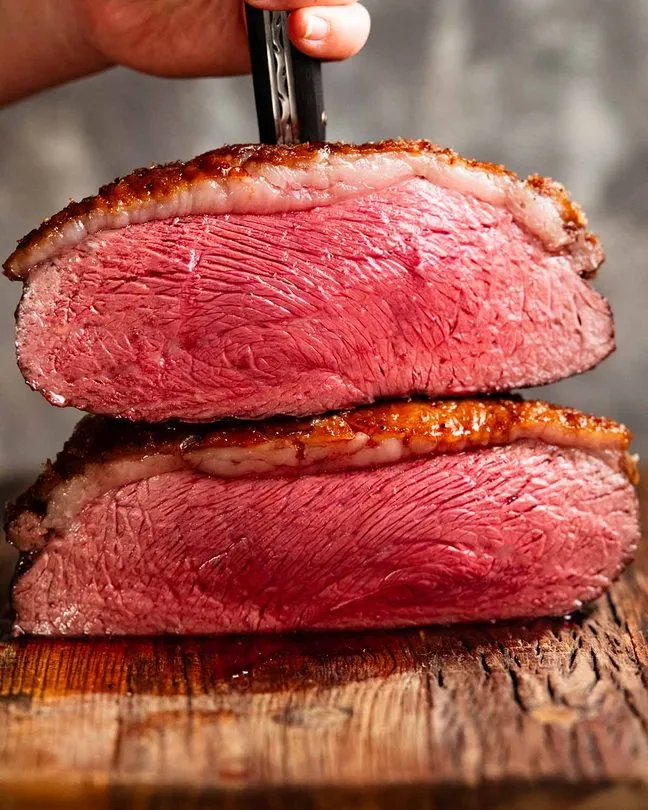
The flavor is rich and deeply beefy. The outer crust becomes savory and slightly crisp, while the fat cap adds buttery richness. Simple seasoning enhances the natural flavor rather than masking it.
Texture is tender with a slight chew that makes it satisfying. When sliced correctly against the grain, the meat becomes noticeably more tender while remaining juicy.
Ingredients
Rump cap roast is the star and should ideally have the fat cap intact. This fat protects the meat and adds flavor during cooking.
Salt is essential because it penetrates the surface and enhances the natural beef flavor. Black pepper adds mild heat and depth. Olive oil helps seasoning adhere and assists in browning. Optional aromatics such as garlic and rosemary add subtle fragrance without overpowering the roast.
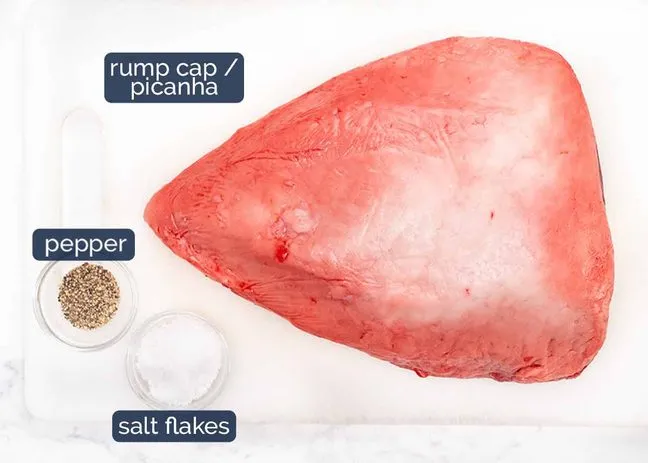
- Rump cap roast (picanha)
- Olive oil
- Salt
- Black pepper
- Garlic, minced (optional)
- Fresh rosemary or thyme (optional)
How to Make Rump Cap Roast
Step-by-Step Instructions
Step 1. Prepare the Roast
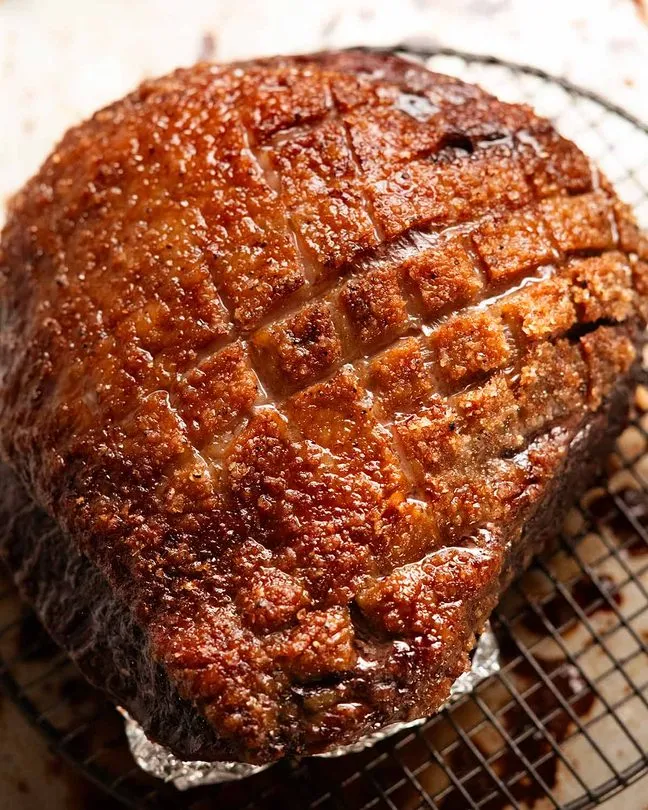
Pat the roast dry with paper towels. Score the fat cap lightly in a crosshatch pattern without cutting into the meat.
Step 2. Season the Meat
Rub the roast with olive oil, then season generously with salt and black pepper. Add garlic and herbs if using.
Step 3. Preheat the Oven
Preheat the oven to 425°F.
Step 4. Start with High Heat
Place the roast fat-side up on a roasting rack. Roast for 20 minutes to develop a crust.
Step 5. Reduce the Temperature
Lower the oven temperature to 325°F and continue roasting until the internal temperature reaches your preferred doneness (about 125–130°F for medium-rare).
Step 6. Rest the Meat
Remove the roast from the oven and let it rest for 10–15 minutes. This allows the juices to redistribute.
Step 7. Slice and Serve
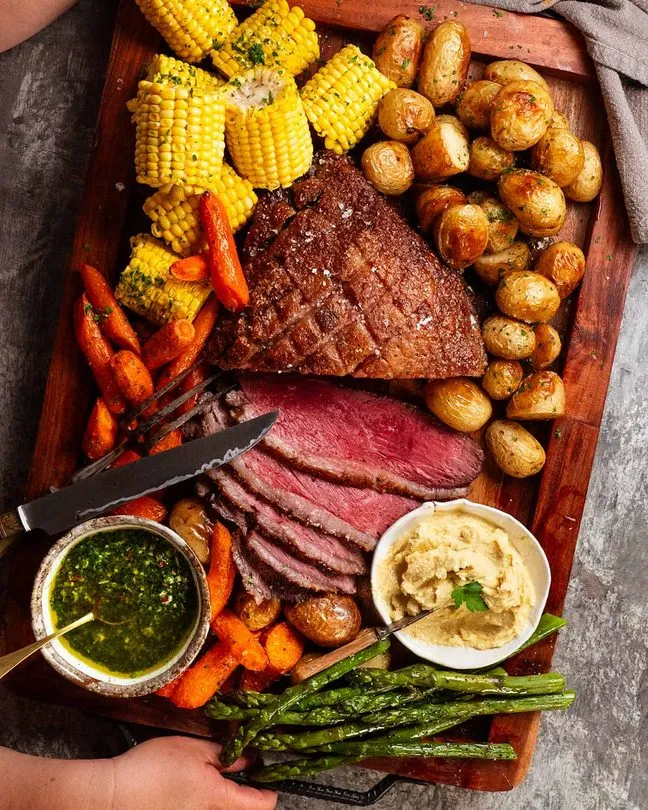
Slice the meat thinly against the grain and serve immediately.
Best Temperature for Doneness
Medium-rare is the most common target for rump cap roast because it keeps the meat tender and juicy. Cooking beyond medium can firm up the texture. Using a meat thermometer ensures accurate results.
What to Serve With Rump Cap Roast
This roast pairs well with roasted potatoes, grilled vegetables, or simple salads. Chimichurri sauce is also a classic accompaniment that adds brightness to the rich beef. Keep sides simple so the roast remains the focus.
Make-Ahead and Storage Tips
Leftover roast can be stored in the refrigerator for up to four days. Slice thinly and reheat gently to prevent drying out. It also works well cold in sandwiches or salads.
Common Mistakes to Avoid
Removing the fat cap reduces flavor and moisture. Overcooking the roast leads to dry meat. Skipping the resting step causes juices to run out when sliced. Another mistake is slicing with the grain instead of against it.
FAQs
What is rump cap roast?
It is a flavorful cut from the top of the rump, commonly called picanha.
Can I grill it instead of roasting?
Yes, rump cap is excellent on the grill.
Should I trim the fat cap?
No, it helps keep the meat moist and flavorful.
Why is slicing important?
Cutting against the grain makes the meat noticeably more tender.
Rump Cap Roast
Ingredients
Equipment
Method
- Preheat oven to 425°F.
- Pat the roast dry with paper towels and lightly score the fat cap in a crosshatch pattern without cutting into the meat.
- Rub the roast with olive oil and season evenly with salt and black pepper. Add garlic and herbs if using.
- Place the roast fat-side up on a roasting rack in a pan and roast for 20 minutes to develop a crust.
- Lower the oven temperature to 325°F and continue roasting until the internal temperature reaches about 125–130°F for medium-rare.
- Remove the roast from the oven and let it rest for 10–15 minutes.
- Slice thinly against the grain and serve warm.
Video
Notes
- Keep the fat cap intact for moisture and flavor.
- Use a meat thermometer for accurate doneness.
- Always slice against the grain for tender meat.
- Resting the roast prevents juices from escaping when cut.